Sunday, 30 October 2011

.Week Seven at The School of Make Up.

I honestly cannot believe i'm going into my 8th week at the school... halfway through the make up bit! Aaaaah scary stuff. This week we had a new tutor Jo, who is one of the lovliest people I have ever met, or been taught by. She taught us all week, and in that week we went through period make up, which was alot of fun as I love looking back in time at old pictures, so actually doing make up from different time periods was really good.

Monday.

16th Century: Okay, think Queen Elizabeth I... Let's face it, they didn't look too chic back in that day... They used to put a lead mixture on their face and just leave it there for weeks, they used to bathe in urine (YES REALLY!) and they used blood from beetles to create their lipstick. Hmmm, give me MAC any day. So as you can guess, the look isn't that beautiful, as you have to make it look 'lived in' *shudder*. Where the F was Liz Earle in the 16th Century?!!


Nice wig too eh?!

Victorian 'no make up' look: In the Victorian times, make up wasn't generally worn, because it was seen as deceitful - I would have been labelled a witch or something! So this look was extremely basic and simple. I secretly like the no make up look, so it was quite nice to do. It also made me fall back in love with MAC Face and Body...


Jo also did period hair on some of us to pull the look together, which I thought was a really nice touch.

Tuesday.

1920s: To be honest, I think I should have been alive in the 20's. Flapper dresses, sharp bobs and little blunt fringes were the flavour of the era, and none of that Victorian no make up guff, no siree! The ladies went all out for nights out and occasions - black as black round smokey eye and plum/aubergine lips.

Me as a 1920s girl, flapper cap and all!

Jemma's 1920's work.
I wasn't 100% happy with my 1920s, which is why there is a lack of photos of my work here. I did re-do the look on Friday so will post my picture there! We didn't do 1930s, as it is very similar to the 20s.

1940s: 40s make up is actually a lovely look. Quite a basic look, slight definition to the eyes, red/orange lips and a lovely matte base. Jo did the demo on Jemma and gave her a really cute 40s hairstyle to go with the look...


My 1940s look on Jemma.
Wednesday.

1950s: The main bits about a 1950s make up was the 'ticked' eyeliner, orange toned lips with the cupids bow peaks placed wider apart and square angular brows. In the daytime, women wore neutral colours on their eyes but for evening, turquose and aquamarine shades were very popular.


1960s: I was the model for the 60s look which was a laugh to say the least! My hairstyle at the end made me a) look like I was in Heartbeat and b) look about 40. Here is a link to a video of me being made up by Jo... Link.


My 1960s work on Olivia.
Thursday.

1970s: Time to get the glitter out girls! Don't get me wrong, not every woman wore glitter in the 70s but we did a kind of disco look at school. My favourite 70s woman is by Farrah Fawcett - She was so beautiful. Jo did the demo on Emma, and ended up giving her abit of a Farrah hair do!

Jo's 70s demo on the lovely Emma.
 
My 70s look on Andrea.


Glitter!
1980s: Obviously not everyone in the 1980s was a punk, but that is the look we went for! I for one am not keen on it - Lots of colours that sometimes don't really go very well together. But I did it anyway and secretly ended up rather liking it.


Yes, they did wear their blusher like that... Questionable.

Friday.

1990s: Oh the 90s. Fun filled times full of Tammy Girl, The Spice Girls, Yoyos, Tamagotchis and Furbys. Also full of matte, terracotta lips...


Practice afternoon: As I said earlier, I wasn't very happy with my 1920s look, so in the afternoon I practiced and (nearly) perfected it. I was really happy with the way it turned out, so my confidence was back. Emma also had a slight incident earlier in the week and ended up with a bit of a shiner, so I practiced covering that too. All in all, a successful end to a fabulous week!

Emma's shiner before.

After!
1920s.

1920s.
So there's another week at SOM. I think we're doing special effects make up this coming week which I really cannot wait for! Hope you've had a lovely weekend. I'm watching TOWIE at the moment - WHAT IS MARIO PLAYING AT!? PIG!!!!

Kate x

Sunday, 23 October 2011

.Week Six at The School of Make Up.

Happy Sunday everyone! I am spending it in bed being a lazy bum. I have so far watched The Bachelor, The Xtra Factor, A Cinderella Story and I am now onto Monster-in-Law. It's lovely to have a lazy day, especially after a busy, fun-filled week at school. This week was airbrushing which I loved... Here's a run down.

Monday & Wednesday.

We started the week with Elaine, learning airbrushing basics. We started with foundation application, first doing a light base and then moving onto a heavier one. Airbrush make up is very similar to being spray tanned. There is a compressor that provides the pressure needed, and an airbrush attachment that the product goes into for application. Pressure can be adjusted depending on what area of the body you're applying the make up too, for example you would turn it down for eye make up. There are so many airbrush make up brands such as Dinair, Kett and Temptu which we use at the college but the main brand for foundation is Airbase. Take a look at the site if you fancy finding out more.

I'm combining Monday and Wednesday in this post because the days were quite similar. We had Sam on Wednesday who was teaching us the other face basics - Highlight, contour, blush and bronze. You have to be quite precise with the airbrush when you're applying it to precise areas of the face so we practiced quite a lot to get that as close to perfect as we could. I really love airbrush make up and will definitely be investing in a kit for when i'm working. It goes on flawlessly and looks amazing in photos, so it's perfect for lots of things from bridal make up to runway shows. If applied correctly, you normally don't even need to conceal and spots, just under the eyes. You can get a base, highlighter, contour, blusher and bronzer on in 5-10 minutes so it's fabulous if you're on a tight schedule. Here is my partner Emma after being airbrushed by me.


Tuesday.

Elaine demonstrated eye make up with airbrush today. You will very rarely use eye airbrush make up unless you're on a television/film set and you need to do hundreds of extras without much up close detail. I did quite enjoy eye airbrushing, but like Elaine said, you can create a much more detailed eye make up with a brush in the same amount of time. In the afternoon she did a creative airbrush design on Olivia.


We practiced some creative airbrushing on each other too, but I have never said i'm very creative, so no pictures of my amazing zebra airbrush unfortunately! Hehe.

Thursday.

Thursday was amazingly fun! We were doing bruising and zombie make up today with the airbrushing. In the morning we did bruises. There are alot of stages to a bruise, which you would have to research if you were doing bruising on a job, but we did the first stage of a bruise. Quite a lot of detail goes into this to make it look as real as possible, and it's not just abit of purple around the eye like I thought originally!

Elaine's bruise demo.

My bruise attempt.
Obviously, Elaine's is miles better than mine. We have all got into the mindset of 'blend blend blend' and bruises need to be 'badly blended' so we need to get that into our heads! Practice makes perfect.

In the afternoon came the fun part - Death/zombie make up! I have been looking forward to this, and special effects make up, since I applied for the course, so I jumped at the chance to be Elaine's demo for this look. It consists of a lot of stages, first of all basic death make up and then moving into zombie make up. It was abit morbid/creepy to see myself with a dead face but it's amazing how real it looks. By the end of it, I had blood eye drops in my eyes, greasy hair, blood smeared in my mouth and around my ears and nose and brown tooth enamel painted onto my teeth - sexy! Here are all the pictures from the fun afternoon we had! Enjoy...


Elaine's Zombie demo.

Zombie with a Shellac manicure!

Elaine's Zombie demo.
 
Elaine's Zombie demo.

My Zombie look on Chelsey.

Chelsey's zombie look on me.

Chelsey's Zombie look.

AJ's edit! L-R: Me, Zoe and Emma.

Friday.

We had Jon today, and he taught us spray tanning. I trained in spray tanning when I did my beauty therapy qualification, but it was nice to have a refresher on it. Sometimes on shoots the designer will want the model to have a warmer skin tone and they will expect you to know how to spray tan, and it's always good to offer it to brides. In the afternoon he gave each pair a script and we had to break it down, going through it and writing notes on the character's make up and seeing where we would have to keep check of the continuity. Chelsey and I had an eastenders episode which was good fun to read through!

So that's week six over with! Time is seriously flying by, it's scary. Follow me on twitter for updates through the week of my college life @katelambie - Hope you've all had a lovely weekend.

Kate x


.Treasure Hunt.

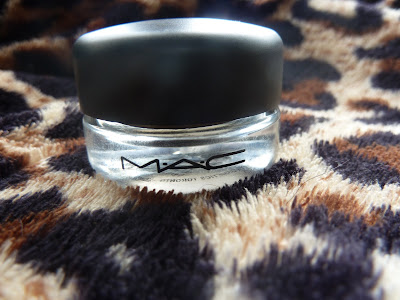
Last weekend, I was in Manchester for the annual Beauty Show with my friends and naturally we ended up in the beauty hall in Selfridges. I was hanging around the MAC counter as my friend Kelly blew her wages on lots of products, not planning to buy anything, until I spotted one of the MUAs eye make up. Whoops. She had a beautiful brown bronzed smokey eye going on with this amazing green gold glitter shade over the lid. She told me she had just used lots of browns blended together and then put a Paint Pot that was in the new collection, Posh Paradise, over it.

The Paint Pot in question is Genuine Treasure, described on the website as 'reflects antiqued gold', and retailing for £13.50.


This is my first ever paintpot, believe it or not. I am definitely more of a powder shadow fan, but I really do love the texture of this shadow, and it has great staying power. It looks beautiful on it's own or dabbed over another smokey eye look. I always apply eye primer before applying my shadow and I do think this makes a difference to the staying power.

Genuine Treasure on it's own.


Genuine Treasure over a brown smokey eye.


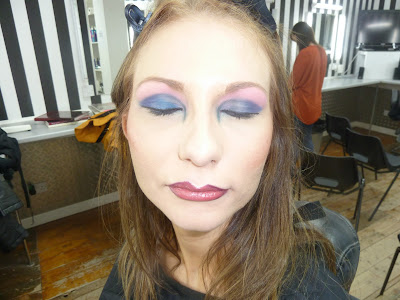
Full look.
All in all, a very positive first experience with MAC's Paint Pots. I am always a bit dubious of cream shadows because they have a tendancy to crease and look abit 'bleurgh' by the end of the day, but I think i've found a winner here. Also, I believe an eyeshadow base is 100% necessary for these kind of formulations. I wore this for over six hours the other day and it was still crease free and stuck fast by the time came to remove my make up. What do you think of Paint Pots, or for that matter, any other creamy based eye products?

Kate x

Sunday, 16 October 2011

.Week Five at The School of Make Up.

Monday.

We had Elaine today and she set us another challenge. She gave us a brief of establishing a character for film or television. Elaine had chosen a character for us each from either a film or a television program, and from the brief she gave us we had to create the character we thought they were. Her brief for me was a kooky young lady who worked within the media industry in the 1940s. She had a beauty mark on her cheek, a dark choppy bob and was strong and independant. Elaine wanted red lips and defined eyes. Can you guess who it was? I couldn't - note to self, must watch more films. It was Liza Minnelli in Cabaret.


Here is what I came up with on my partner Emma:


In the afternoon, we started measuring up for bald caps. This involved cling film, sellotape and a plastic head - random, but we were well on our way to becoming bald by the end of Monday!

Tuesday.

Emma was all better this week, so we had her teaching us today. In the morning, we did stubble effects with different kind of make up. I felt pretty damn sexy with some designer stubble going on...


In the afternoon we started making our bald caps. Bald cap making is not plain sailing in the slightest, and it takes a time and patience to make and fit them. Creating the cap consisted of vaseline-ing the plastic head with the template on, painting on 8 layers of cap plastic and powdering each layer with talc after drying the plastic with a hair dryer. Once the layers were completed, the caps were left over night to set. In the morning, this was the finished creation.

Creepy looking bit of scalp!
Wednesday/Thursday.

Both Wednesday and Thursday consisted of fitting the bald caps. What a bloody laugh! I actually have the biggest, roundest head I have ever seen... I don't think bald is one of my best looks. Oh well it was all in the name of research! I will say no more and give you a good old laugh with some pictures from the two days...

Bald cap being fitted.

Emma's 'seductive' bald look.


My bald cap work.

Emma and Chelsey bald.

Stroking the bald head.

Me bald... No words.
Olive and I - seductive Olivia.

The four Thursday baldies.

The four Wednesday baldies.
On Thursday afternoon, Emma also demonstrated a port wine stain which we then practiced. Port wine stains are raised on the skin so we had to build up a 3D effect with 'liquid flesh' - Lovely. In other words, liquid latex. Once it was built up, we then shaded in it.


Friday.

We had Sam today for a practice day, in which we could recap anything we had already learnt. I decided to perfect my eyeliner and lipliner. It was a nice chilled day and was good to go over things again and gain more confidence in the areas we thought we were struggling in.

I had a really fun week at the school this week, and we start airbrush make up tomorrow which I am really looking forward to! Hope you have all had a lovely weekend.

Kate x